Spring管理BeanIOC
Bean 管理包括两方面
创建 bean 对象
给 bean 注入属性
Bean 配置方式
基于 xml 文件配置方式
基于注解方式
基于 xml 文件配置方式
通过 spring 的 ioc 容器, 获取一个 bean 对象
<bean id="monster01" class="com.hspedu.spring.beans.Monster">
	<property name="monsterId" value="1"/>
	<property name="name" value="牛魔王"/>
	<property name="skill" value="牛魔王拳"/>
</bean>通过类型来获取 bean 对象
*/***

*** 通过类型来获取容器的*bean* 对象

**/*

@Test

public void getMonsterByType() {
		ApplicationContext ioc = new ClassPathXmlApplicationContext("beans.xml"); Monster monster = ioc.getBean(Monster.class);
  	System.*out*.println("monster=" + monster);
		Monster monster2 = ioc.getBean(Monster.class);
		System.out.println("monster == monster2 的值= " + (monster == monster2))
}细节说明
1、按类型来获取 bean, 要求 ioc 容器中的同一个类的 bean 只能有一个, 否则会抛出异常
NoUniqueBeanDefinitionException
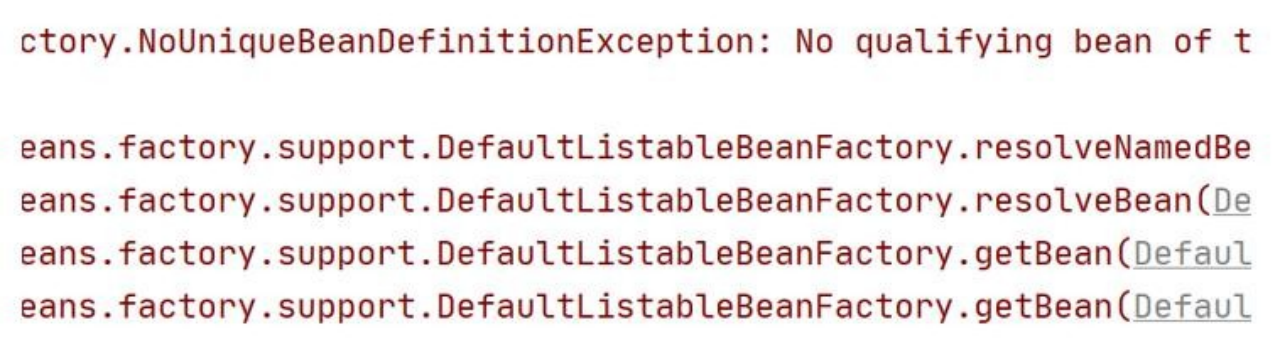
2、这种方式的应用场景:比如 XxxAction/Servlet/Controller, 或XxxService 在一个线程中只需要一个对象实例(单例)的情况
3、老师这里在说明一下: 在容器配置文件(比如 beans.xml)中给属性赋值, 底层是通过setter 方法完成的, 这也是为什么我们需要提供 setter 方法的原因
通过构造器配置 bean
在 spring 的 ioc 容器, 可以通过构造器来配置 bean 对象
<bean id="monster02" class="com.hspedu.spring.beans.Monster">
	<constructor-arg value="2" index="0"/>
	<constructor-arg value="蜘蛛精" index="1"/>
	<constructor-arg value="吐口水" index="2"/>
</bean>


<!-- 数据类型就是对应的 Java 数据类型,按构造器参数顺序-->
<bean id="monster03" class="com.hspedu.spring.beans.Monster">
	<constructor-arg value="3" type="java.lang.Integer"/>
	<constructor-arg value="白骨精" type="java.lang.String"/>
	<constructor-arg value="白骨鞭" type="java.lang.String"/>
</bean>@Test
public void getMonsterByConstructor() {
ApplicationContext ioc = new ClassPathXmlApplicationContext("beans.xml");
Object monster02 = ioc.getBean("monster02");
Object monster03 = ioc.getBean("monster03");
System.out.println("monster02= " + monster02);
System.out.println("monster03= " + monster03);
}使用细节
- 通过 index 属性来区分是第几个参数
- 通过 type 属性来区分是什么类型(按照顺序)
通过 p 名称空间配置 bean
在 spring 的 ioc 容器, 可以通过 p 名称空间来配置 bean 对象
<beans xmlns="http://www.springframework.org/schema/beans"
       xmlns:xsi="http://www.w3.org/2001/XMLSchema-instance"
       xmlns:p="http://www.springframework.org/schema/p"
       xsi:schemaLocation="http://www.springframework.org/schema/beans
				http://www.springframework.org/schema/beans/spring-beans.xsd">
	<!-- 在 spring 的 ioc 容器, 可以通过 p 名称空间来配置 bean 对象-->
	<bean id="monster04" class="com.hspedu.spring.beans.Monster" p:monsterId="4" p:name="红孩儿" p:skill="吐火~"/>
</beans>@Test
public void getMonsterByP() {
ApplicationContext ioc = new ClassPathXmlApplicationContext("beans.xml");
Monster monster04 = ioc.getBean("monster04", Monster.class);
System.out.println("monster04=" + monster04);
}引用/注入其它 bean 对象
在 spring 的 ioc 容器, 可以通过 ref 来实现 bean 对象的相互引用
/**
* @author 韩顺平
* @version 1.0
*/
public class MemberDAOImpl {
  public MemberDAOImpl() {
  	System.out.println("MemberDAOImpl 构造器...");
  }
  public void add() {
  	System.out.println("MemberDAOImpl add()方法");
  }
}/**
* @author 韩顺平
* @version 1.0
*/
public class MemberServiceImpl {
private MemberDAOImpl memberDAO;
public MemberServiceImpl() {
System.out.println("MemberServiceImpl 构造器~");
}
public void add() {
System.out.println("MemberServiceImpl add()...");
memberDAO.add();
}
public void setMemberDAO(MemberDAOImpl memberDAO) {
this.memberDAO = memberDAO;
}
public MemberDAOImpl getMemberDAO() {
return memberDAO;
}
}
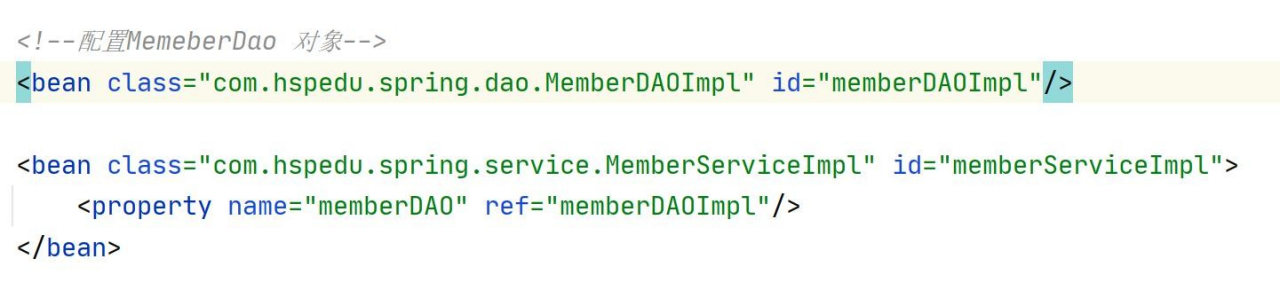
bean 对象的相互引用
- 其它含义和前面一样
- ref 表示 memberDAO 这个属性将引用/指向 id = memberDAOImpl 对象
<bean id="memberServiceImpl" class="com.hspedu.spring.service.MemberServiceImpl">
  <property name="memberDAO" ref="memberDAOImpl"/>
</bean>
<bean id="memberDAOImpl" class="com.hspedu.spring.dao.MemberDAOImpl"/>@Test
public void setBeanByRef() {
ApplicationContext ioc = new ClassPathXmlApplicationContext("beans.xml");
MemberServiceImpl memberServiceImpl = ioc.getBean("memberServiceImpl", MemberServiceImpl.class);
memberServiceImpl.add();
}引用/注入内部 bean 对象
引用/注入内部 bean 对象, 直接在配置 bean 时注入
<bean id="memberServiceImpl02" class="com.hspedu.spring.service.MemberServiceImpl">
  <property name="memberDAO">
  	<bean class="com.hspedu.spring.dao.MemberDAOImpl"/>
  </property>
</bean>@Test
public void setBeanByPro() {
ApplicationContext ioc = new ClassPathXmlApplicationContext("beans.xml");
MemberServiceImpl memberServiceImpl02 = ioc.getBean("memberServiceImpl02", MemberServiceImpl.class);
memberServiceImpl02.add();
}引用/注入集合/数组类型
在 spring 的 ioc 容器, 看看如何给 bean 对象的集合/数组类型属性赋值
/**
* @author 韩顺平
* @version 1.0
*/
public class Master {
  private String name;
  private List<Monster> monsterList;
  private Map<String, Monster> monsterMap;
  private Set<Monster> monsterSet;
  private String[] monsterName;
  //这个 Properties 是 Hashtable 的子类 , 是 key-value 的形式//这里 Properties key 和 value 都是 String
  private Properties pros;
  	public Master() {
  }
  public Master(String name) {
  	this.name = name;
  }
  public Set<Monster> getMonsterSet() {
  	return monsterSet;
  }
  public void setMonsterSet(Set<Monster> monsterSet) {
    this.monsterSet = monsterSet;
  }
  public String[] getMonsterName() {
  	return monsterName;
  }
  public void setMonsterName(String[] monsterName) {
  	this.monsterName = monsterName;
  }
  public String getName() {
  	return name;
  }
  public void setName(String name) {
  	this.name = name;
  }
  public List<Monster> getMonsterList() {
  	return monsterList;
  }
  public void setMonsterList(List<Monster> monsterList) {
  	this.monsterList = monsterList;
  }
  public Map<String, Monster> getMonsterMap() {
  	return monsterMap;
  }
  public void setMonsterMap(Map<String, Monster> monsterMap) {
  	this.monsterMap = monsterMap;
  }
  public Properties getPros() {
  	return pros;
  }
  public void setPros(Properties pros) {
  	this.pros = pros;
  }
}<!-- 给集合属性注入值
-->
<bean id="master01" class="com.hspedu.spring.beans.Master">
<property name="name" value="太上老君"/>
<!-- 给 bean 对象的 list 集合赋值 -->
<property name="monsterList">
<list>
<ref bean="monster03"/>
<ref bean="monster02"/>
</list>
</property>
<!-- 给 bean 对象的 map 集合赋值 -->
<property name="monsterMap">
<map>
<entry>
<key>
<value>monsterKey01</value>
</key>
<ref bean="monster01"/>
</entry>
<entry>
<key>
<value>monsterKey02</value>
</key>
<ref bean="monster02"/>
</entry>
</map>
</property>
<!-- 给 bean 对象的 properties 集合赋值 -->
<property name="pros">
<props>
<prop key="k1">Java 工程师</prop>
<prop key="k2">前端工程师</prop>
<prop key="k3">大数据工程师</prop>
</props>
</property>
<!-- 给 bean 对象的数组属性注入值 -->
<property name="monsterName">
<array>
<value>银角大王</value>
<value>金角大王</value>
</array>
</property>
<!-- 给 bean 对象的 set 属性注入值 -->
<property name="monsterSet">
<set>
<ref bean="monster01"/>
<bean class="com.hspedu.spring.beans.Monster">
<property name="monsterId" value="10"/>
<property name="name" value="玉兔精"/>
<property name="skill" value="钻地洞"/>
</bean>
</set>
</property>
</bean>/**
* 测试 引用/注入集合/数组类型
*/
@Test
public void setCollectionByPro() {
ApplicationContext ioc = new ClassPathXmlApplicationContext("beans.xml");
Master master01 = ioc.getBean("master01", Master.class);
//获取 list 集合
System.out.println("======list=======");
List<Monster> monster_list = master01.getMonsterList();
for (Monster monster : monster_list) {
System.out.println(monster);
}
//获取 map 集合
System.out.println("======map=======");
Map<String, Monster> monster_map = master01.getMonsterMap();
Set<Map.Entry<String, Monster>> entrySet = monster_map.entrySet();
for (Map.Entry<String, Monster> entry : entrySet) {
System.out.println(entry);
}
//获取 properties 集合
System.out.println("======properties=======");
Properties pros = master01.getPros();
String property1 = pros.getProperty("k1");
String property2 = pros.getProperty("k2");
String property3 = pros.getProperty("k3");
System.out.println(property1 + "\t" + property2 + "\t" + property3);
//获取数组
System.out.println("======数组=======");
String[] monsterName = master01.getMonsterName();
for (String s : monsterName) {
System.out.println("妖怪名= " + s);
}
//获取 set
System.out.println("======set=======");
Set<Monster> monsterSet = master01.getMonsterSet();
for (Monster monster : monsterSet) {
System.out.println(monster);
}
}使用细节
主要掌握 List/Map/Properties 三种集合的使用.
Properties 集合的特点
这个 Properties 是 Hashtable 的子类 , 是 key-value 的形式
key 是 string 而 value 也是 string
通过 util 名称空间创建 list
spring 的 ioc 容器, 可以通过 util 名称空间创建 list 集合
public class BookStore {//书店
	private List<String> bookList;
  public BookStore() {
	}
  public List<String> getBookList() {
  	return bookList;
  }
  public void setBookList(List<String> bookList) {
  	this.bookList = bookList;
  }
}<beans xmlns="http://www.springframework.org/schema/beans"
xmlns:xsi="http://www.w3.org/2001/XMLSchema-instance"
xmlns:p="http://www.springframework.org/schema/p"
xmlns:util="http://www.springframework.org/schema/util"
xsi:schemaLocation="http://www.springframework.org/schema/beans
http://www.springframework.org/schema/beans/spring-beans.xsd
http://www.springframework.org/schema/util
http://www.springframework.org/schema/util/spring-util.xsd">
<!--通过 util 名称空间来创建 list 集合,可以当做创建 bean 对象的工具来使用-->
<util:list id="myListBook">
<value>三国演义</value>
<value>西游记</value>
<value>红楼梦</value>
<value>水浒传</value>
</util:list>
<bean id="bookStore" class="com.hspedu.spring.beans.BookStore">
<property name="bookList" ref="myListBook"/>
</bean>
</beans>@Test
public void getListByUtil() {
ApplicationContext ioc = new ClassPathXmlApplicationContext("beans.xml");
BookStore bookStore = ioc.getBean("bookStore", BookStore.class);
List<String> bookList = bookStore.getBookList();
for (String s : bookList) {
System.out.println(s);
}
}级联属性赋值
spring 的 ioc 容器, 可以直接给对象属性的属性赋值, 即级联属性赋值
public class Dept {
  private String name;
  public Dept() {
  }
  public String getName() {
  	return name;
  }
  public void setName(String name) {
  	this.name = name;
  }
}public class Emp {
private String name;
private Dept dept;
public Emp() {
}
public String getName() {
return name;
}
public void setName(String name) {
this.name = name;
}
public Dept getDept() {
return dept;
}
public void setDept(Dept dept) {
this.dept = dept;
}
}<!-- 级联属性赋值
-->
<bean id="emp" class="com.hspedu.spring.beans.Emp">
<property name="name" value="jack"/>
<property name="dept" ref="dept"/>
<property name="dept.name" value="Java 开发部"/>
</bean>
<bean id="dept" class="com.hspedu.spring.beans.Dept"/>/**
* 测试 级联属性赋值
*/
@Test
public void setProByRelation() {
ApplicationContext ioc = new ClassPathXmlApplicationContext("beans.xml");
Emp emp = ioc.getBean("emp", Emp.class);
System.out.println(emp.getDept().getName());
}通过静态工厂获取对象
在 spring 的 ioc 容器, 可以通过静态工厂获取 bean 对象
public class MyStaticFactory {
  private static Map<String, Monster> monsterMap;
  static {
    monsterMap = new HashMap<String, Monster>();
    monsterMap.put("monster_01", new Monster(100, "黄袍怪", "一阳指"));
    monsterMap.put("monster_02", new Monster(200, "九头金雕", "如来神掌"));
  }
  public static Monster getMonster(String key) {
  	return monsterMap.get(key);
  }
}<!-- 通过静态工厂来获取 bean 对象 -->
<bean id="my_monster" class="com.hspedu.spring.factory.MyStaticFactory"
factory-method="getMonster">
<!-- constructor-arg 标签提供 key -->
<constructor-arg value="monster_01"/>
</bean>@Test
public void getBeanByStaticFactory() {
ApplicationContext ioc = new ClassPathXmlApplicationContext("beans.xml");
Monster my_monster = ioc.getBean("my_monster", Monster.class);
System.out.println(my_monster);
}通过实例工厂获取对象
在 spring 的 ioc 容器, 可以通过实例工厂获取 bean 对象
/**
* @author 韩顺平
* @version 1.0
*/
public class MyInstanceFactory {
  private Map<String, Monster> monster_map;
  //非静态代码块
  {
    monster_map = new HashMap<String, Monster>();
    monster_map.put("monster_01", new Monster(100, "猴子精", "吃人"));
    monster_map.put("monster_02", new Monster(200, "九头金雕", "如来神掌"));
  }
  public Monster getMonster(String key) {
  	return monster_map.get(key);
  }
}<bean id="myInstanceFactory" class="com.hspedu.spring.factory.MyInstanceFactory"/><bean id="my_monster2" factory-bean="myInstanceFactory"
factory-method="getMonster">
<constructor-arg value="monster_02"/>
</bean>@Test
public void getBeanByInstanceFactory() {
ApplicationContext ioc = new ClassPathXmlApplicationContext("beans.xml");
Monster my_monster = ioc.getBean("my_monster2", Monster.class);
System.out.println(my_monster);
}通过 FactoryBean 获取对象(重点)
在 spring 的 ioc 容器,通过 FactoryBean
public class MyFactoryBean implements FactoryBean<Monster> {
  private String keyVal;
  private Map<String, Monster> monster_map;
  {
    monster_map = new HashMap<String, Monster>();
  	monster_map.put("monster_01", new Monster(100, "黄袍怪", "一阳指"));
  	monster_map.put("monster_02", new Monster(200, "九头金雕", "如来神掌"));
  }
  public void setKeyVal(String keyVal) {
  	this.keyVal = keyVal;
  }
  @Override
  public Monster getObject() throws Exception {
    // TODO Auto-generated method stub
    return this.monster_map.get(keyVal);
  }
  @Override
  public Class getObjectType() {
    // TODO Auto-generated method stub
    return Monster.class;
  }
  @Override
  public boolean isSingleton() {
    // TODO Auto-generated method stub
    return true;
  }
}<!-- 老韩解读
1. 通过 FactoryBean 来获取 bean 对象
2. name="keyVal" 就是 MyFactoryBean 定义的 setKeyVal 方法3. value="monster_01" ,就是给 keyVal 的值
-->
<bean id="myFactoryBean" class="com.hspedu.spring.factory.MyFactoryBean">
<property name="keyVal" value="monster_01"/>
</bean>@Test
public void getBeanByFactoryBean() {
ApplicationContext ioc = new ClassPathXmlApplicationContext("beans.xml");
Monster monster = ioc.getBean("myFactoryBean", Monster.class);
System.out.println(monster);
}bean 配置信息重用(继承)
在 spring 的 ioc 容器, 提供了一种继承的方式来实现 bean 配置信息的重用
<!-- 继承的方式来实现 bean 配置信息的重用 -->
<bean id="monster10" class="com.hspedu.spring.beans.Monster">
  <property name="monsterId" value="10"/>
  <property name="name" value="蜈蚣精"/>
  <property name="skill" value="蜇人"/>
</bean>
<!-- parent="monster10" 就是继承使用了 monster10 的配置信息-->
<bean id="monster11" class="com.hspedu.spring.beans.Monster" parent="monster10"/>
<!-- 当我们把某个bean设置为 abstract="true" 这个bean只能被继承,而不能实例化了-->
<bean id="monster12" class="com.hspedu.spring.beans.Monster" abstract="true">
  <property name="monsterId" value="12"/>
  <property name="name" value="美女蛇"/>
  <property name="skill" value="吃人"/>
</bean>
<!-- parent="monster12" 就是继承使用了 monster12 的配置信息-->
<bean id="monster13" class="com.hspedu.spring.beans.Monster" parent="monster12"/>@Test
public void getBeanByExtends() {
ApplicationContext ioc = new ClassPathXmlApplicationContext("beans.xml");
Monster monster1 = ioc.getBean("monster11", Monster.class);
System.out.println(monster1);
Monster monster2 = (Monster) ioc.getBean("monster13", Monster.class);
System.out.println(monster2);
}bean 创建顺序
<bean id="student01" class="com.hspedu.bean.Student" />
<bean id="department01" class="com.hspedu.bean.Department" />
<!--在 spring 的 ioc 容器, 默认是按照配置的顺序创建 bean 对象 会先创建 student01 这个 bean 对象,然后创建 department01 这个bean 对象--><bean id="student01" class="com.hspedu.bean.Student" depends-on="department01"/>
<bean id="department01" class="com.hspedu.bean.Department" />
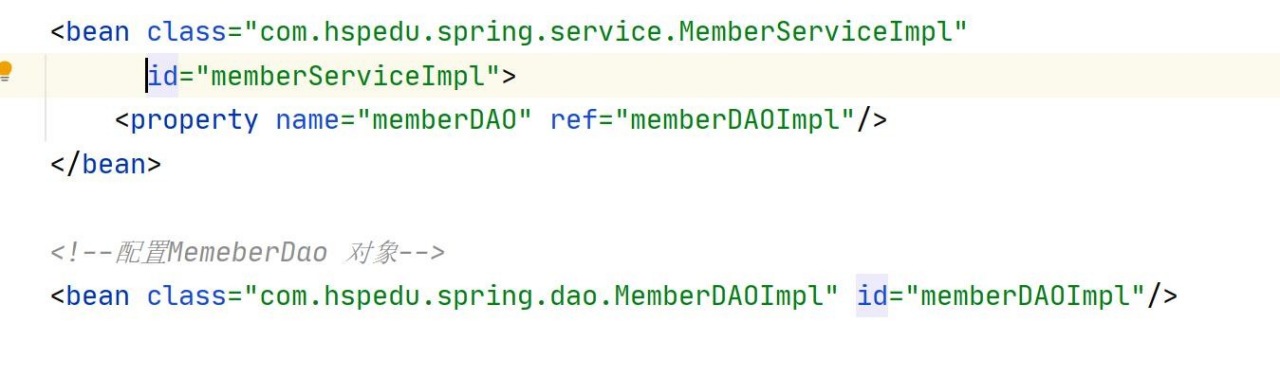
<!--如果这样配置 会先创建 department01 对象,再创建 student01 对象-->先看下面的配置, 请问两个 bean 创建的顺序是什么? 并分析执行流程
先创建 id=memberDAOImpl
再创建 id = memberServiceImpl
调用 memberServiceImpl.setMemberDAO() 完成引用
先看下面的配置, 请问两个 bean 创建的顺序是什么, 并分析执行流程
先创建 id = memberServiceImpl
再创建 id=memberDAOImpl
用 memberServiceImpl.setMemberDAO()
bean 对象的单例和多例
在 spring 的 ioc 容器, 在默认是按照单例创建的,即配置一个bean 对象后,ioc 容器只会创建一个 bean 实例。
如果,我们希望 ioc 容器配置的某个 bean 对象,是以多个实例形式创建的则可以通过配置scope="prototype" 来指定
public class Car {
  public Car() {
  	System.out.println("car 构造器");
  }
}<!--如果,我们希望 ioc 容器配置的某个 bean 对象,是以多个实例形式创建的则可以通过配置scope="prototype" 来指定-->
<bean name="car" scope="prototype" class="com.hspedu.spring.beans.Car"/>@Test
public void getBeanByPrototype() {
ApplicationContext ioc = new ClassPathXmlApplicationContext("beans.xml");
for (int i = 0; i < 3; i++) {
Car car = ioc.getBean("car", Car.class);
System.out.println(car);
}
}使用细节
- 默认是单例 singleton, 在启动容器时, 默认就会创建 , 并放入到singletonObjects 集合
- 当
<bean scope="prototype" >设置为多实例机制后, 该bean 是在getBean()时才创建- 如果是单例singleton, 同时希望在
getBean时 才创建, 可以指定懒加载lazy-init="true" (注意默认是 false)- 通常情况下, lazy-init 就使用默认值 false , 在开发看来, 用空间换时间是值得的, 除非有特殊的要求.
- 如果 scope="prototype" 这时你的 lazy-init 属性的值不管是ture, 还是false都是在getBean 时候,才创建对象.
bean 的生命周期
bean 对象创建是由 JVM 完成的,然后执行如下方法
- 执行构造器
- 执行 set 相关方法
- 调用 bean 的初始化的方法(需要配置)
init-method="" destroy-method=""- 使用 bean
- 当容器关闭时候,调用 bean 的销毁方法(需要配置)
public class House {
  private String name;
  public House() {
  	System.out.println("House() 构造器");
  }
  public String getName() {
  	return name;
  }
  public void setName(String name) {
    System.out.println("House setName()...");
    this.name = name;
  }
  public void init() {
  	System.out.println("House init()..");
  }
  public void destory() {
  	System.out.println("House destory()..");
  }
}<!-- 配置 bean 的初始化方法和销毁方法 -->
<bean id="house" class="com.hspedu.spring.beans.House"
init-method="init" destroy-method="destory">
<property name="name" value="北京豪宅"/>
</bean>@Test
public void beanLife() {
ApplicationContext ioc = new ClassPathXmlApplicationContext("beans.xml");
House house = ioc.getBean("house", House.class);
System.out.println(house);
//关闭容器
((ConfigurableApplicationContext) ioc).close();
}使用细节
- 初始化 init 方法和 destory 方法, 是程序员来指定
- 销毁方法就是当关闭容器时,才会被调用.
配置 bean 的后置处理器 【这个比较难】
- 在 spring 的 ioc 容器,可以配置 bean 的后置处理器
- 该处理器/对象会在 bean 初始化方法调用前和初始化方法调用后被调用
- 程序员可以在后置处理器中编写自己的代码
public class MyBeanPostProcessor implements BeanPostProcessor {
  /**
  * 在 bean 初始化之前完成某些任务
  * @param bean : 就是 ioc 容器返回的 bean 对象, 如果这里被替换会修改,则返回的 bean 对象也会被修改
  * @param beanName: 就是 ioc 容器配置的 bean 的名称
  * @return Object: 就是返回的 bean 对象
  */
  public Object postProcessBeforeInitialization(Object bean, String beanName) throws BeansException {
    // TODO Auto-generated method stub
    System.out.println("postProcessBeforeInitialization 被调用" + beanName+"bean= " + bean.getClass());
    return bean;
  }
  /**
  * 在 bean 初始化之后完成某些任务
  * @param bean : 就是 ioc 容器返回的 bean 对象, 如果这里被替换会修改,则返回的 bean 对象也会被修改
  * @param beanName: 就是 ioc 容器配置的 bean 的名称
  * @return Object: 就是返回的 bean 对象
  */
  public Object postProcessAfterInitialization(Object bean, String beanName) throws BeansException {
    System.out.println("postProcessAfterInitialization 被调用" + beanName +" bean="+ bean.getClass());
    return bean;
	}
}<!-- 配置 bean 的初始化方法和销毁方法 -->
<bean id="house" class="com.hspedu.spring.beans.House"
init-method="init" destroy-method="destory">
<property name="name" value="北京豪宅"/>
</bean>
<!-- bean 后置处理器的配置 -->
<bean id="myBeanPostProcessor"class="com.hspedu.spring.beans.MyBeanPostProcessor" />@Test
public void testBeanPostProcessor() {
ApplicationContext ioc = new ClassPathXmlApplicationContext("beans02.xml");
House house = ioc.getBean("house", House.class);
System.out.println(house);
//关闭容器
((ConfigurableApplicationContext) ioc).close();
}其它说明
1、怎么执行到这个方法:使用 AOP(反射+动态代理+IO+容器+注解)
2、有什么用:可以对 IOC 容器中所有的对象进行统一处理,比如日志处理/权限的校验/安全的验证/事务管理. -初步体验案例: 如果类型是 House 的统一改成 上海豪宅
3、针对容器的所有对象吗:是的 切面编程特点
4、后面我们会自己实现这个底层机制,这个是一个比较难理解的知识点, 现在老韩不做过多的纠结,后面我会带小伙伴实现这个机制
通过属性文件给 bean 注入值
在 spring 的 ioc 容器,通过属性文件给 bean 注入值
name=\u9EC4\u888D\u602A
id=10
skill=\u72EE\u5B50\u543C<beans xmlns="http://www.springframework.org/schema/beans"
xmlns:xsi="http://www.w3.org/2001/XMLSchema-instance" xmlns:p="http://www.springframework.org/schema/p"
xmlns:util="http://www.springframework.org/schema/util"
xmlns:context="http://www.springframework.org/schema/context"
xmlns:aop="http://www.springframework.org/schema/aop" xsi:schemaLocation="http://www.springframework.org/schema/beans
http://www.springframework.org/schema/beans/spring-beans.xsd
http://www.springframework.org/schema/util
http://www.springframework.org/schema/util/spring-util.xsd
http://www.springframework.org/schema/context
http://www.springframework.org/schema/context/spring-context.xsd">
<!-- 老韩解读:
1. 通过属性文件给 bean 注入值,
2. 需要导入: xmlns:context 名字空间,并指定属性文件路径
-->
<context:property-placeholder location="classpath:my.properties"/>
<bean id="monster100" class="com.hspedu.spring.beans.Monster">
<property name="monsterId" value="${id}"/>
<property name="name" value="${name}"/>
<property name="skill" value="${skill}"/>
</bean>
</beans>@Test
public void setProByProFile() {
ApplicationContext ioc = new ClassPathXmlApplicationContext("beans.xml");
Monster monster100 = ioc.getBean("monster100", Monster.class);
System.out.println(monster100);
}基于 XML 的 bean 的自动装配
在 spring 的 ioc 容器,可以实现自动装配 bean
- 这个知识点作为了解即可,后面我们主要还是使用基于注解的方式(重点)
- 但是机制和原理类似
public class OrderDao {
  public void saveOrder() {
    System.out.println("保存 一个订单...");
  }
}public class OrderService {
private OrderDao orderDao;
public OrderDao getOrderDao() {
return orderDao;
}
public void setOrderDao(OrderDao orderDao) {
this.orderDao = orderDao;
}
}public class OrderAction {
private OrderService orderService;
public OrderService getOrderService() {
return orderService;
}
public void setOrderService(OrderService orderService) {
this.orderService = orderService;
}
}<beans>
<bean id="orderAction" autowire="byName" class="com.hspedu.spring.action.OrderAction"></bean>
<bean id="orderService" autowire="byName" class="com.hspedu.spring.service.OrderService"></bean>
<bean id="orderDao" class="com.hspedu.spring.dao.OrderDao"></bean>
</beans>基于xml的bean的自动装配 演示 特别说明: autowire = "byName" 会自动去找 id为setXxxx后面Xxxx的bean自动组装,如果找到就装配,如果找不到就报错, 比如这里的 bean id="orderAction" autowire="byName" class="com.hspedu.bean.OrderAction" 就会去找OrderAction 类中定义的 setOrderService 的id 为orderService的OrderService bean组装,找到就阻装,找不到就组装失败
spring_el 表达式
- Spring Expression Language,Spring 表达式语言,简称 SpEL。支持运行时查询并可以操作对象。
- 和 EL 表达式一样,SpEL 根据 JavaBean 风格的 getXxx()、setXxx()方法定义的属性访问对象
- SpEL 使用#{…}作为定界符,所有在大框号中的字符都将被认为是SpEL 表达式。
不是重点,如果看到有人这样使用,能看懂即可
public class SpELBean {
  private String name;
  private Monster monster;
  private String monsterName;
  private String crySound;
  private String bookName;
  private Double result;
  public SpELBean() {
  }
  public String getName() {
  	return name;
  }
  public void setName(String name) {
  	this.name = name;
  }
  public Monster getMonster() {
  	return monster;
  }
  public void setMonster(Monster monster) {
  	this.monster = monster;
  }
  public String getMonsterName() {
  	return monsterName;
  }
  public void setMonsterName(String monsterName) {
  	this.monsterName = monsterName;
  }
  public String getCrySound() {
  	return crySound;
  }
  public void setCrySound(String crySound) {
  	this.crySound = crySound;
  }
  public String getBookName() {
  	return bookName;
  }
  public void setBookName(String bookName) {
  	this.bookName = bookName;
  }
  public Double getResult() {
  	return result;
  }
  public void setResult(Double result) {
  	this.result = result;
  }
  public String cry(String sound) {
  	return "发出 " + sound + "叫声...";
  }
  public static String read(String bookName) {
  	return "正在看 " + bookName;
  }
}<bean id="spELBean" class="com.hspedu.spring.beans.SpELBean">
<!-- sp el 给字面量 -->
<property name="name" value="#{'韩顺平教育'}"/>
<!-- sp el 引用其它 bean -->
<property name="monster" value="#{monster01}"/>
<!-- sp el 引用其它 bean 的属性值 -->
<property name="monsterName" value="#{monster02.name}"/>
<!-- sp el 调用普通方法 赋值 -->
<property name="crySound" value="#{spELBean.cry('喵喵的..')}"/>
<!-- sp el 调用静态方法 赋值 -->
<property name="bookName" value="#{T(com.hspedu.spring.beans.SpELBean).read(' 天龙八部')}"/>
<!-- sp el 通过运算赋值 -->
<property name="result" value="#{89*1.2}"/>
</bean>@Test
public void setProBySpel() {
ApplicationContext ioc = new ClassPathXmlApplicationContext("beans.xml");
SpELBean spELBean = ioc.getBean("spELBean", SpELBean.class);
System.out.println(spELBean.getName());
System.out.println(spELBean.getMonster());
System.out.println(spELBean.getMonsterName());
System.out.println(spELBean.getCrySound());
System.out.println(spELBean.getBookName());
System.out.println(spELBean.getResult());
}基于注解配置 bean
基于注解的方式配置 bean, 主要是项目开发中的组件,比如Controller、Service、和Dao.
组件注解的形式
- @Component 表示当前注解标识的是一个组件
- @Controller 表示当前注解标识的是一个控制器,通常用于Servlet
- @Service 表示当前注解标识的是一个处理业务逻辑的类,通常用于Service 类
- @Repository 表示当前注解标识的是一个持久化层的类,通常用于Dao 类
快速入门
引入 spring-aop-5.3.8.jar , 在 spring/libs 下拷贝即可
package com.hspedu.spring.component;
@Repository
public class UserDao {
}package com.hspedu.spring.component;
@Service
public class UserService {
}package com.hspedu.spring.component;
@Controller
public class UserAction {
}package com.hspedu.spring.component;
@Component
public class MyComponent {
}<!-- 配置自动扫描的包,注意需要加入 context 名称空间 -->
<context:component-scan base-package="com.hspedu.spring.component" />@Test
public void getBeanByAnnotation() {
ApplicationContext ioc = new ClassPathXmlApplicationContext("beans.xml");
UserAction userAction = ioc.getBean(UserAction.class);
System.out.println(userAction);
UserDao userDao = ioc.getBean(UserDao.class);
System.out.println(userDao);
MyComponent myComponent = ioc.getBean(MyComponent.class);
System.out.println(myComponent);
UserService userService = ioc.getBean(UserService.class);
System.out.println(userService);
}注意事项和细节说明
需要导入 spring-aop-5.3.8.jar , 别忘了
必须在 Spring 配置文件中指定"自动扫描的包",IOC 容器才能够检测到当前项目中哪些类被标识了注解, 注意到导入 context 名称空间
context:component-scan base-package="com.hspedu.spring.component"可以使用通配符 * 来指定 ,比如 com.hspedu.spring.* 表示
com.hspedu.spring.component 会不会去扫描它的子包? 答:会的Spring 的 IOC 容器不能检测一个使用了@Controller 注解的类到底是不是一个真正的控制器。注解的名称是用于程序员自己识别当前标识的是什么组件。其它的@Service@Repository 也是一样的道理 [也就是说 spring 的 IOC 容器只要检查到注解就会生成对象,但是这个注解的含义 spring 不会识别,注解是给程序员编程方便看的]
resource-pattern="User*.class": 表示只扫描满足要求的类.[使用的少,不想扫描,不写注解就可以, 知道这个知识点即可]
context:component-scan base-package="com.hspedu.spring.component"
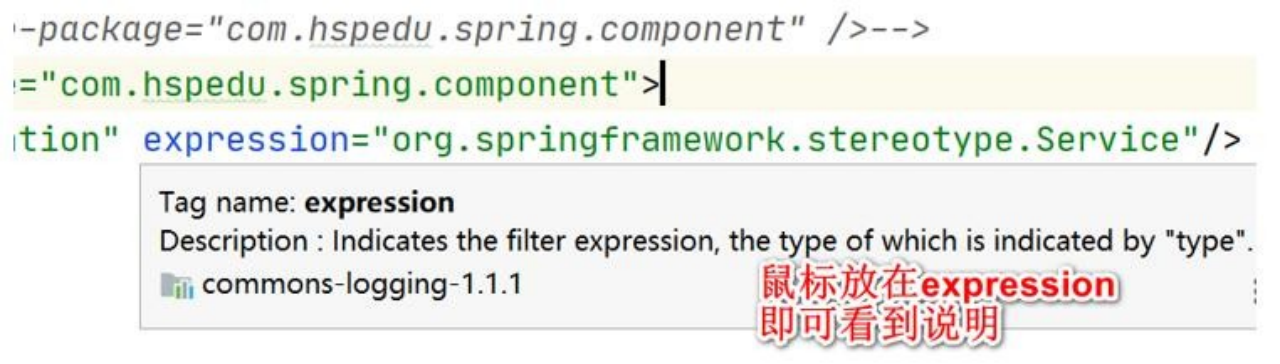
context:exclude-filter type="annotation"expression="org.springframework.stereotype.Service"/ /context
<!-- 老韩解读
1. <context:exclude-filter> 放在<context:component-scan>内,表示扫描过滤掉当前包的某些类
2. type="annotation" 按照注解方式进行过滤.
3. expression :就是注解的全类名,比如 org.springframework.stereotype.Service就是@Service 注解的全类名,其它比@Controller @Repository 等 依次类推
4. 上面表示过滤掉 com.hspedu.spring.component 包下,加入了@Service 注解的类-->
<context:component-scan base-package="com.hspedu.spring.component">
	<context:exclude-filter type="annotation" expression="org.springframework.stereotype.Service"/>
</context:component-scan>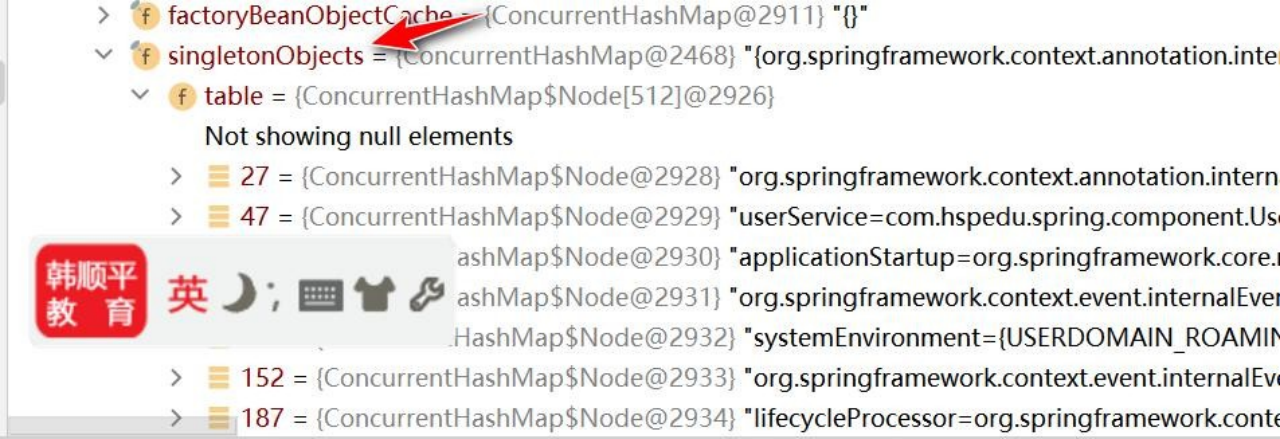
- 指定自动扫描哪些注解类
<!--
1. use-default-filters="false": 不再使用默认的过滤机制
2. context:include-filter: 表示只是扫描指定的注解的类
3. expression="org.springframework.stereotype.Controller": 注解的全类名-->
<context:component-scan base-package="com.hspedu.spring.component"use-default-filters="false">
  <context:include-filter type="annotation"expression="org.springframework.stereotype.Service"/>
  <context:include-filter type="annotation"expression="org.springframework.stereotype.Controller"/>
</context:component-scan>
@Test
public void testBeanByIncludefilter() {
  ApplicationContext ioc = new ClassPathXmlApplicationContext("beans.xml");
  System.out.println("----------");
  UserAction userAction = ioc.getBean(UserAction.class);
  System.out.println(userAction);
  UserService userService = ioc.getBean(UserService.class);
  System.out.println(userService);
  //下面这个就会报错
  UserDao userDao = ioc.getBean(UserDao.class);
  System.out.println(userDao);
}
- 默认情况:标记注解后,类名首字母小写作为 id 的值。也可以使用注解的value属性指定 id 值,并且 value 可以省略。[代码演示]
@Controller(value="userAction01")
@Controller("userAction01")//修改 UserAction.java
@Controller("userAction01")
public class UserAction{
}@Test
public void getBeanByAnnotationId() {
ApplicationContext ioc = new ClassPathXmlApplicationContext("beans.xml");
//默认 id 获取
// UserAction userAction = ioc.getBean("userAction",UserAction.class);
// System.out.println(userAction);
//指定 id 获取
UserAction userAction01 = ioc.getBean("userAction01", UserAction.class);
System.out.println(userAction01);
}
- 扩展-@Controller 、@Service、@Component 区别 : (回去看看一下老师的讲解的注解基础) https://zhuanlan.zhihu.com/p/454638478
手动开发简单的Spring基于注解配置的程序
自 己 写 一 个 简 单 的 Spring 容 器 , 通 过 读 取 类 的 注解(@Component @Controller@Service @Reponsitory),将对象注入到 IOC 容器
也就是说,不使用 Spring 原生框架,我们自己使用 IO+Annotaion+反射+集合技术实现, 打通 Spring 注解方式开发的技术痛点
思路分析
思路分析+程序结构
我们使用注解方式完成, 这里老韩不用 xml 来配置
程序框架图

代码实现
- 手动实现注解的方式来配置 Controller/Service/Respository/ Component
- 我们使用自定义注解来完成.
/**
* @author 韩顺平
* @version 1.0
* 定义我们的 ComponentScan 注解
*/
@Retention(RetentionPolicy.RUNTIME)
@Target(ElementType.TYPE)
public @interface ComponentScan {
	String value();
}/**
* @author 韩顺平
* @version 1.0
* 作用类似我们的 beans.xml 文件, 用于对 spring 容器指定配置信息*/
//指定要扫描的包
@ComponentScan("com.hspedu.spring.component")
public class HspSpringConfig {
}/**
* @author 韩顺平
* @version 1.0
* HspSpringApplicationContext 类的作用类似Spring原生ioc容器
*/
public class HspSpringApplicationContext {
private Class configClass;
//ioc我存放的就是通过反射创建的对象(基于注解方式)
private final ConcurrentHashMap<String, Object> ioc =
new ConcurrentHashMap<>();
//构造器
public HspSpringApplicationContext(Class configClass) {
this.configClass = configClass;
//System.out.println("this.configClass=" + this.configClass);
//获取要扫描的包
//1. 先得到HspSpringConfig配置的的@ComponentScan(value = "com.hspedu.spring.component")
ComponentScan componentScan =
(ComponentScan) this.configClass.getDeclaredAnnotation(ComponentScan.class);
//2. 通过componentScan的value=> 即要扫描的包
String path = componentScan.value();
System.out.println("要扫描的包= " + path);
//得到要扫描的包下的所有资源(类 .class)
//1.得到类的加载器
ClassLoader classLoader =
HspApplicationContext.class.getClassLoader();
//2. 通过类的加载器获取到要扫描的包的资源 url=》类似一个路径
path = path.replace(".", "/");//一定要把. 替换成 /
URL resource =
classLoader.getResource(path);
System.out.println("resource=" + resource);
//3. 将要加载的资源(.class) 路径下的文件进行遍历=>io
File file = new File(resource.getFile());
if (file.isDirectory()) {
File[] files = file.listFiles();
for (File f : files) {
System.out.println("=====================");
System.out.println("=" + f.getAbsolutePath());
//D:\hspedu_spring\spring\out\production\spring\com\hspedu\spring\component\UserService.class
//获取到 com.hspedu.spring.component.UserService
String fileAbsolutePath = f.getAbsolutePath();
//这里我们只处理.class文件
if (fileAbsolutePath.endsWith(".class")) {
//1. 获取到类名
String className =
fileAbsolutePath.substring(fileAbsolutePath.lastIndexOf("\\") + 1, fileAbsolutePath.indexOf(".class"));
//System.out.println("className=" + className);
//2. 获取类的完整的路径(全类名)
//老师解读 path.replace("/",".") => com.hspedu.spring.component.
String classFullName = path.replace("/", ".") + "." + className;
//System.out.println("classFullName=" + classFullName);
//3. 判断该类是不是需要注入容器, 就看该类是不是有注解 @Component @Service..
try {
//这时,我们就得到老该类的Class对象
//Class clazz = Class.forName(classFullName)
//老师说一下
//1. Class clazz = Class.forName(classFullName) 可以反射加载类
//2. classLoader.loadClass(classFullName); 可以反射类的Class
//3. 区别是 : 上面方式后调用来类的静态方法, 下面方法不会
//4. aClass.isAnnotationPresent(Component.class) 判断该类是否有 @Component
Class<?> aClass = classLoader.loadClass(classFullName);
if (aClass.isAnnotationPresent(Component.class) ||
aClass.isAnnotationPresent(Controller.class) ||
aClass.isAnnotationPresent(Service.class) ||
aClass.isAnnotationPresent(Repository.class)) {
//这里老师演示一个Component注解指定value,分配id
//老师就是演示了一下机制.
if(aClass.isAnnotationPresent(Component.class)) {
//获取到该注解
Component component = aClass.getDeclaredAnnotation(Component.class);
String id = component.value();
if(!"".endsWith(id)) {
className = id;//替换
}
}
//这时就可以反射对象,并放入到容器中
Class<?> clazz = Class.forName(classFullName);
Object instance = clazz.newInstance();
//放入到容器中, 将类名的首字母小写作为id
//StringUtils
ioc.put(StringUtils.uncapitalize(className) , instance);
}
} catch (Exception e) {
e.printStackTrace();
}
}
}
}
}
//编写方法返回对容器中对象
public Object getBean(String name) {
return ioc.get(name);
}
}public class HspSpringAnnoationMain {
public static void main(String[] args) {
//创建我们的 spring 容器对象
HspSpringApplicationContext hspSpringApplicationContext =
new HspSpringApplicationContext(HspSpringConfig.class);
//可以看看注入了哪些 bean. ConcurrentHashMap<String, Object> ioc =
hspSpringApplicationContext.getIoc();
//遍历一把
Enumeration<String> keys = ioc.keys();
for (String key : ioc.keySet()) {
System.out.println("bean id= " + key + " bean 对象= " + ioc.get(key));
}
//指定获取 bean
UserDao userDao =
(UserDao) hspSpringApplicationContext.getBean("UserDao");
//调用方法. userDao.hi();
}
}注意事项和细节说明
还可以通过@Component(value = "xx") @Controller(value = "yy") @Service(value="zz")中指定的 value, 给 bean 分配 id (上面的实现代码已经实现该功能)
/**
 * @author 韩顺平
 * @version 1.0
 * @Component 标识该类是一个组件, 是一个通用的注解
 */
@Component(value = "hsp1")
public class MyComponent {
}自动装配
基于注解配置 bean,也可实现自动装配,使用的注解是:@AutoWired 或者@Resource
@AutoWired 的规则说明
在 IOC 容器中查找待装配的组件的类型,如果有唯一的bean 匹配,则使用该bean装配
如待装配的类型对应的 bean 在 IOC 容器中有多个,则使用待装配的属性的属性名作为 id 值再进行查找, 找到就装配,找不到就抛异常
@Resource 的规则说明
- @Resource 有两个属性是比较重要的,分是 name 和 type,Spring 将@Resource注解的name 属性解析为 bean 的名字,而 type 属性则解析为 bean 的类型.所以如果使用name属性,则使用 byName 的自动注入策略,而使用 type 属性时则使用byType 自动注入策略
- 如果@Resource 没有指定 name 和 type ,则先使用byName注入策略, 如果匹配不上, 再使用 byType 策略, 如果都不成功,就会报错
应用实例
@Service
public class UserService {
  public void hi(){
  	System.out.println("UserService hi()~");
  }
}@Controller("userAction01")
public class UserAction {
//@Autowired //自动装配 UserService, 这时是以 id=userService 的UserService对象进行组装. @Autowired
private UserService userService;
public void sayOk(){
System.out.println("UserAction.userService= " + userService);
userService.hi();
}
//不写这个方法,也可以完成组装
public void setUserService(UserService userService) {
this.userService = userService;
}
}/**
* 基于注解的方式配置 bean-自动装配
*/
@Test
public void setProByAnnotationAutowired() {
ApplicationContext ioc = new ClassPathXmlApplicationContext("beans.xml");
UserAction userAction01 = ioc.getBean(UserAction.class);
userAction01.sayOk();
}注意事项和细节说明
如待装配的类型对应的 bean 在 IOC 容器中有多个,则使用待装配的属性的属性名作为 id 值再进行查找, 找到就装配,找不到就抛异常
<!-- 增加一个 UserService 对象-->
<bean id="userService02" class="com.hspedu.spring.component.UserService"/>@Controller(value="userAction01")
// @Controller("userAction01")
public class UserAction {
//@Autowired //自动装配 UserService, 这时是以 id=userService 的UserService对象进行组装.
//@Autowired
//指定 id 进行组装, 这时,是装配的 id=userService02 , 需要两个注解都需要写上@Autowired
@Qualifier(value = "userService02")//指定 id=userService02 的UserService对象进行组装
private UserService userService;
public void sayOk(){
System.out.println("UserAction.userService= " + userService);
userService.hi();
}
public void setUserService(UserService userService) {
this.userService = userService;
}
}@Test
public void setProByAnnotationAutowired() {
ApplicationContext ioc = new ClassPathXmlApplicationContext("beans.xml");
UserAction userAction01 = ioc.getBean(UserAction.class);
userAction01.sayOk();
UserService userService = ioc.getBean("userService", UserService.class);
System.out.println("userService= " + userService);
UserService userService02 = ioc.getBean("userService02", UserService.class);
System.out.println("userService02= " + userService02);
}泛型依赖注入
泛型依赖解释
- 为了更好的管理有继承和相互依赖的 bean 的自动装配,spring 还提供基于泛型依赖的注入机制
- 在继承关系复杂情况下,泛型依赖注入就会有很大的优越性
应用实例
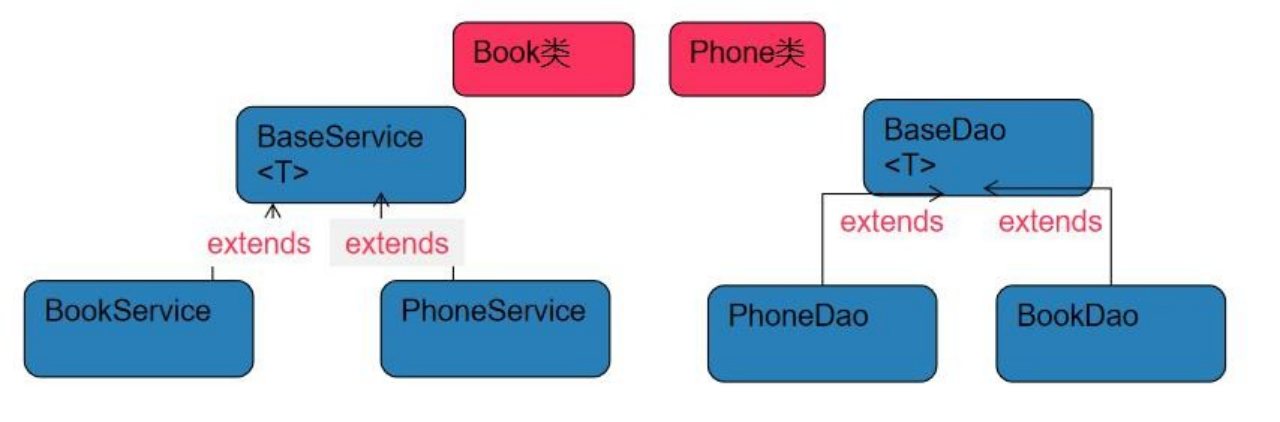
传统方法是将 PhoneDao /BookDao 自动装配到 BookService/PhoneSerive 中,当这种继承关系多时,就比较麻烦,可以使用 spring 提供的泛型依赖注入
public class Book {

}public class Phone {
}public abstract class BaseDao<T> {
public abstract void save();
}@Repository
public class BookDao extends BaseDao<Book> {
@Override
public void save() {
System.out.println("BookDao 的 save()");
}
}@Repository
public class PhoneDao extends BaseDao<Phone> {
@Override
public void save() {
System.out.println("PhoneDao 的 save()");
}
}public class BaseService<T> {
@Autowired
private BaseDao<T> baseDao;
public void save() {
baseDao.save();
}
}@Service
public class BookService extends BaseService<Book> {
}@Service
public class PhoneService extends BaseService<Phone> {
}<context:component-scan base-package="com.hspedu.spring.depinjection"/>/**
* 测试 spring 基于泛型依赖的 bean 的自动装配
*/
@Test
public void setProByDepinjectionAutowired() {
ApplicationContext ioc = new ClassPathXmlApplicationContext("beans.xml");
BookService bookService = ioc.getBean(BookService.class);
bookService.save();
PhoneService phoneService = ioc.getBean(PhoneService.class);
phoneService.save();
}